
As part of my hands-on cloud journey, I recently tackled the challenge of setting up OpenStack using MicroStack on a local Ubuntu VM running in VMware. This project helped sharpen my troubleshooting skills and gave me deeper insights into how OpenStack operates in a constrained, local environment.
Project Goal
To install and configure OpenStack (MicroStack) on Ubuntu using Snap and successfully launch a virtual machine instance from the OpenStack dashboard or CLI.
Before we begin, ensure you have the following:
A machine running Ubuntu 20.04 or later: This can be a physical machine, a virtual machine, or a cloud instance with at least 8 GB of RAM and 50 GB of disk space.
Basic knowledge of Linux command-line operations: Familiarity with terminal commands will be beneficial.

Step1.
Oop! Microstack --classic is not available but --edge is available
You need to rerun the command and specify a role. If this is the first and only node (single-node setup), choose --control:
sudo microstack init --auto --control


Yes, running the command: sudo microstack init --auto --control
will set up your Ubuntu VM as a single-node control plane. This setup includes the OpenStack dashboard (Horizon), the API endpoints, and compute capabilities — perfect for testing or learning.
Access the OpenStack Dashboard
Here’s What To Do Instead (No CLI Needed for Dashboard URL):
To access the Horizon Dashboard for MicroStack:
Get the Admin Password
Lets Try This Instead to Get the Admin Login Credentials:
Let's try accessing the Horizon Dashboard


Logged in with: Username:admin & Password: from microstack.rc
Bonus Tip (Make It Easy to Load Credentials in Terminal)
To use OpenStack CLI later, you can load the credentials with:
source /var/snap/microstack/common/etc/microstack.rc
Set up a private cloud using MicroStack, launch an instance, and document access via floating IPs and Horizon dashboard.
Step 2: Upload an Image
Upload the Image to OpenStack (MicroStack)
Now, upload it using the microstack.openstack CLI:

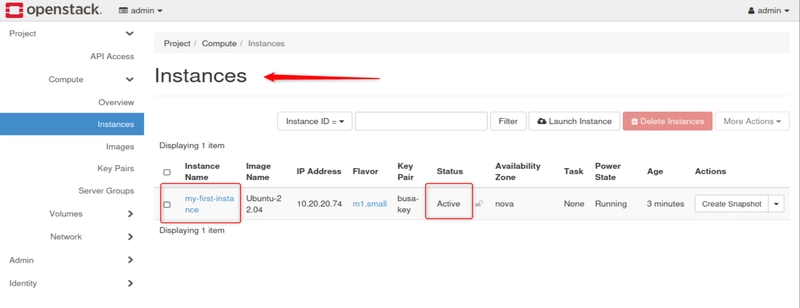
My image Ubuntu-22.04 has been successfully created and registered in OpenStack. The status is active, which means it's ready to be used.
Let's find out if it is listed.
Run this command: microstack.openstack image list

Next I am going to Launch an Instance
I can launch on the dashboard
Fill the Launch Instance Form
Or use the terminal, it will get the same result. Run this command:
microstack.openstack server create \
--flavor m1.small \
--image "Ubuntu-22.04" \
--network external \
--key-name microstack \
my-first-instance

I ran into an error because I didn't add my key-pair busa-key.pem. This is the correct command:
microstack.openstack server create \
--flavor m1.small \
--image "Ubuntu-22.04" \
--network external \
--key-name busa-key \
my-first-instance
Project Summary: MicroStack/OpenStack VM Deployment on Ubuntu
Objective
To install and configure OpenStack (MicroStack) on Ubuntu using Snap, and successfully launch a virtual machine (VM) instance.
Challenges Encountered:
What I Learned:
This project was more than just launching a VM. I gained:
What's Next?
Now that the instance is live, I plan to:
Final Thoughts
This hands-on challenge pushed me to solve real infrastructure issues—just like in production environments. If you're starting out in cloud engineering or DevOps, I highly recommend trying this locally before jumping into full OpenStack deployments in the cloud.
Let me know if you’ve faced similar challenges or want to try this yourself!
🧑💻 #OpenStack #MicroStack #Ubuntu #CloudComputing #DevOps #Linux #VMware #HandsOnCloud #BeginnersJourney
More...
Project Goal
To install and configure OpenStack (MicroStack) on Ubuntu using Snap and successfully launch a virtual machine instance from the OpenStack dashboard or CLI.
Before we begin, ensure you have the following:
A machine running Ubuntu 20.04 or later: This can be a physical machine, a virtual machine, or a cloud instance with at least 8 GB of RAM and 50 GB of disk space.
Basic knowledge of Linux command-line operations: Familiarity with terminal commands will be beneficial.
Step1.
- Install OpenStack using MicroStack
- Update your system: sudo apt update && sudo apt upgrade -y

- Install MicroStack: sudo snap install microstack --classic
Oop! Microstack --classic is not available but --edge is available
- Run the command: sudo snap installmicrostack --classic --edge

- Initialize MicroStack: sudo microstack init --auto
This command sets up a single-node OpenStack deployment with default configurations.

The error you're seeing means that when using --auto, MicroStack requires you to specify a role: either --compute or --control.
You need to rerun the command and specify a role. If this is the first and only node (single-node setup), choose --control:
sudo microstack init --auto --control
Yes, running the command: sudo microstack init --auto --control
will set up your Ubuntu VM as a single-node control plane. This setup includes the OpenStack dashboard (Horizon), the API endpoints, and compute capabilities — perfect for testing or learning.
- Next we run this command: microstack.openstack endpoint list
Purpose: Shows all the service endpoints (internal, public, admin URLs) for OpenStack services.

It looks for any dashboard or horizon related entries (usually under the public URL section).
Access the OpenStack Dashboard
- Retrieve the dashboard URL: sudo microstack.openstack dashboard url
Oop! I got this error.

openstack dashboard url is not a valid OpenStack CLI command.
Here’s What To Do Instead (No CLI Needed for Dashboard URL):
To access the Horizon Dashboard for MicroStack:
- Get Your Ubuntu VM IP Address
- Run this in your Ubuntu terminal:ip a

I am looking for this information: inet 192.168.129.128
This ip 192.168.129.128 is the IP needed to access the dashboard via the browser. - Visit the Dashboard in a Browser
- On your host machine (e.g., Windows or Mac), open a browser and go to: https://192.168.129.128

- You Might See a Security Warning. That’s okay — the dashboard uses a self-signed certificate.
- Click:Advanced → Proceed (unsafe)

Get the Admin Password
- In your terminal, run: sudo snap get microstack config.credentials.password

That error means the password isn’t stored under config.credentials.password, which sometimes happens with newer MicroStack versions or if initialization didn’t complete fully.
Lets Try This Instead to Get the Admin Login Credentials:
- Run this command: sudo cat /var/snap/microstack/common/etc/microstack.rc

This file often contains the exported environment variables including the username, password, project name, and OpenStack endpoint.
Let's try accessing the Horizon Dashboard
Logged in with: Username:admin & Password: from microstack.rc
Bonus Tip (Make It Easy to Load Credentials in Terminal)
To use OpenStack CLI later, you can load the credentials with:
source /var/snap/microstack/common/etc/microstack.rc
Set up a private cloud using MicroStack, launch an instance, and document access via floating IPs and Horizon dashboard.
- Step 1: Create a Key Pair (for SSH Access to VMs)
- Go to: Project > Compute > Key Pairs

- Click Create Key Pair
- Give it a name e.g busa-key

- Save the private key (.pem file) to your host machine

Step 2: Upload an Image
- Go to: Project > Compute > Images
- Click Create Image

Fill in: - Name: ubuntu-22.04
- Image Source: URL or file
- Format: QCOW2
- You can use Ubuntu Cloud Image:
https://cloud-images.ubuntu.com/jamm...dimg-amd64.img - Open a browser in the Ubuntu VM, copy and paste the link above and download the Ubuntu image.
- Alternatively, Download the Ubuntu Cloud Image.
Open your terminal and run: wget https://cloud-images.ubuntu.com/jamm...dimg-amd64.img -O ubuntu-22.04.img

Upload the Image to OpenStack (MicroStack)
Now, upload it using the microstack.openstack CLI:
My image Ubuntu-22.04 has been successfully created and registered in OpenStack. The status is active, which means it's ready to be used.
Let's find out if it is listed.
Run this command: microstack.openstack image list
- Yes, it is listed and as seen below in the image.

Next I am going to Launch an Instance
I can launch on the dashboard
Fill the Launch Instance Form
- Instance Name: my-first-vm
- Count: 1
- Availability Zone: nova
- Instance Boot Source: Choose Image
- Image Name: Select Ubuntu-22.04
- Flavor: Choose m1.small
- Select a network, usually called external.
- Select a keypair to access your VM via SSH.
- Click “Launch Instance"
Or use the terminal, it will get the same result. Run this command:
microstack.openstack server create \
--flavor m1.small \
--image "Ubuntu-22.04" \
--network external \
--key-name microstack \
my-first-instance
I ran into an error because I didn't add my key-pair busa-key.pem. This is the correct command:
microstack.openstack server create \
--flavor m1.small \
--image "Ubuntu-22.04" \
--network external \
--key-name busa-key \
my-first-instance
Project Summary: MicroStack/OpenStack VM Deployment on Ubuntu
Objective
To install and configure OpenStack (MicroStack) on Ubuntu using Snap, and successfully launch a virtual machine (VM) instance.
Challenges Encountered:
- Problem->Network connection failed = Cause -> Missing DHCP and DNS = Solution -> Edited netplan, restarted services, added resolv.conf
- Problem -> Snap install errors = Cause -> Caused by name resolution = Solution -> Resolved after fixing DNS
What I Learned:
This project was more than just launching a VM. I gained:
- Practical knowledge of Linux networking and netplan
- How to debug low-level connectivity issues inside VMs
- Experience installing OpenStack via Snap using MicroStack
- Confidence to work through real-world DevOps roadblocks
What's Next?
Now that the instance is live, I plan to:
- Configure floating IPs to access VMs externally
- Automate more of the setup process using scripts
- Write a follow-up blog on launching applications inside the OpenStack VM
Final Thoughts
This hands-on challenge pushed me to solve real infrastructure issues—just like in production environments. If you're starting out in cloud engineering or DevOps, I highly recommend trying this locally before jumping into full OpenStack deployments in the cloud.
Let me know if you’ve faced similar challenges or want to try this yourself!
🧑💻 #OpenStack #MicroStack #Ubuntu #CloudComputing #DevOps #Linux #VMware #HandsOnCloud #BeginnersJourney
More...